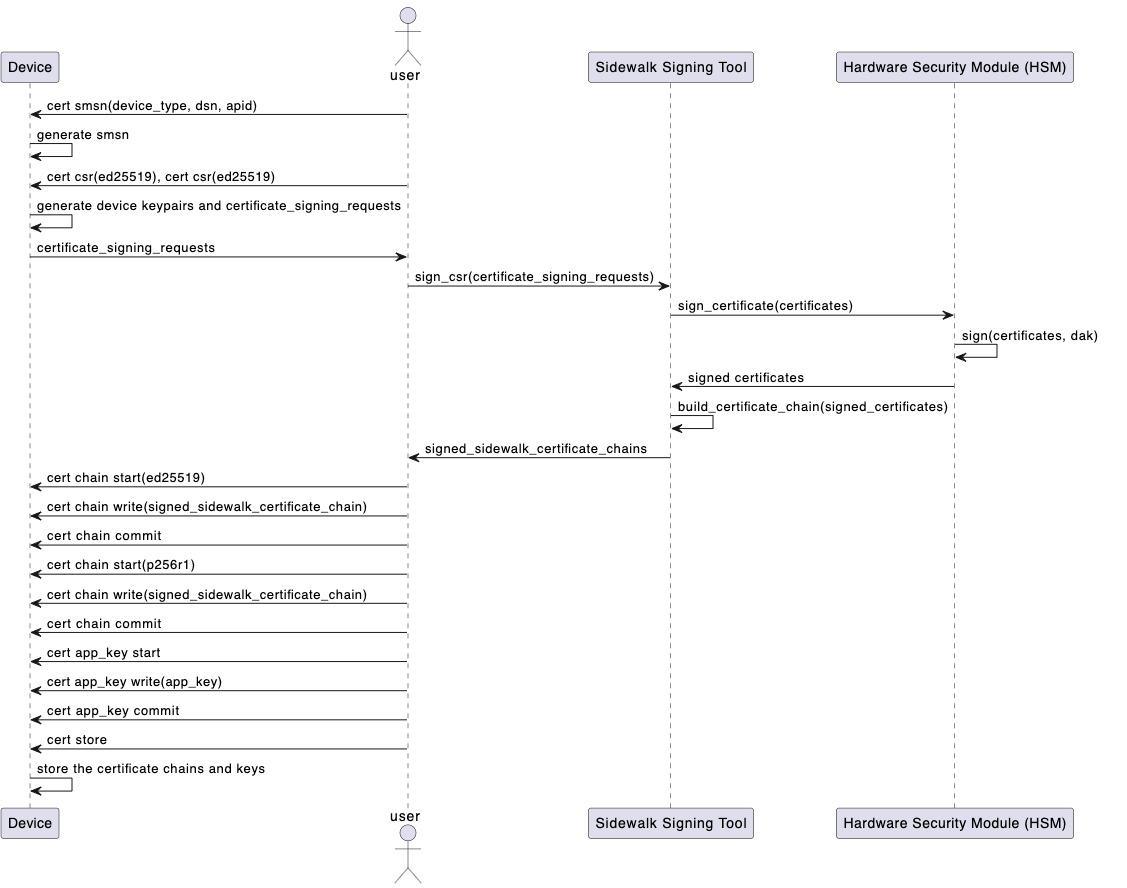
Provisioning with CSR and Sidewalk Signing tool
Each device being manufactured needs to have a unique device certificate. The Sidewalk Signing Tool running on the Line PC will take CSR from the device to generate a Sidewalk certificate and signs it using the Device Attestation Key (DAK) securely stored in the provided Hardware Security Module (HSM). The following steps are involved in provisioning for the manufacturing workflow.
Topics
- Step 1: Generate CSRs for Sidewalk signing tool
- Step 2: Run the YubiHSM connector in the background
- Step 3: Run the Sidewalk signing tool
- Step 4: Store the Sidewalk Certificate Chains to the device
Step 1: Generate CSRs for Sidewalk signing tool
Before the Sidewalk signing tool can sign the certificates, a CSR must be generated for each device being manufactured. A device ready to be provisioned is flashed with a special Factory Diagnostic Firmware, which is responsible for the generation of SMSN and device key pairs of that device (and therefore the CSR). A script running on the line PC communicates with the device via a CLI provided by the Factory Diagnostic Firmware. The CSR is passed as an input to the Sidewalk signing tool, and a signed certificate chain is the output.
Here is an example of using Factory Diagnostic Firmware to trigger the process of CSR generation. See the documentation release by Sidewalk silicon partners for more details.
-
Initialize the certificate generation flow and generate SMSN
 --> cert init
 [00595258] <info> app: {CERT BASE64_MTU=32}
 [00595258] <info> app: {CERT OK}
 --> cert smsn "A17XHX23H06INH" "SN1234567" "pd25"
 [00595323] <info> app: {CERT <dwhuv44g0HQYDxoB//JWaI3uaLqpkMNh>}
 [00595323] <info> app: {CERT <AHDmbIb2/zk=>}
 [00595323] <info> app: {CERT OK}
The command
cert smsnasks the device to generate the SMSN using DeviceTypeId (vended by Amazon Sidewalk team along with the HSM), DSN (Device Serial Number, the unique serial number of the device), and APID. The generated SMSN is then returned in base64-encoded string. As the example shows it is separated into 2 pieces as it’s longer than 32 bytes, and therefore the actual SMSN (encoded in base64) isdwhuv44g0HQYDxoB//JWaI3uaLqpkMNhAHDmbIb2/zk=in this case. -
Generate CSR for Ed25519 and P256R1
 --> cert csr "ed25519"
 [00595427] <info> app: {CERT <jfmuHcN1VgVddvWiIFkFdmNaGHgPBKWA>}
 [00595427] <info> app: {CERT <tlObPtl/n393CG6/jiDQdBgPGgH/8lZo>}
 [00595427] <info> app: {CERT <je5ouqmQw2EAcOZshvb/OcEGVZ938Jhi>}
 [00595427] <info> app: {CERT <rSeJq1LAtt6dY6lUWmQ9uvWOfJXQzrfD>}
 [00595427] <info> app: {CERT <79p9aRTDLxWYd2/Q82b0b9EfUog6jKRF>}
 [00595428] <info> app: {CERT <omXm0016ngc=>}
 [00595428] <info> app: {CERT OK}
 -->
 --> cert csr "p256r1"
 [00595579] <info> app: {CERT <0W996GnBnJ60Ih6F/xh+WYuxEgzPRnw8>}
 [00595579] <info> app: {CERT <6CNuD6r+mVX0Zfyl0o98zV/ztfiiSfm/>}
 [00595579] <info> app: {CERT <DVzXefuvI/DeALsRvnJSlHcIbr+OINB0>}
 [00595579] <info> app: {CERT <GA8aAf/yVmiN7mi6qZDDYQBw5myG9v85>}
 [00595579] <info> app: {CERT <aoSJ/V0l5voCEySRFNOadBXxqLnIhD3p>}
 [00595579] <info> app: {CERT <apQfpxumHpB5hbnvSQG1wxUT5LpDtkO9>}
 [00595580] <info> app: {CERT <dPnH621qufUR+VIT62un2A==>}
 [00595580] <info> app: {CERT OK}
 -->
Commands
cert csr "ed25519"andcert csr "p256r1"make the device generate the key pairs and print out the CSRs for Sidewalk Signing Tools to sign. Again they are separated in chunks of 32 bytes so needed to be concatenated before passing to Sidewalk Signing Tools.
Step 2: Run the YubiHSM connector in the background
If you’re using a Windows machine, the YubiHSM connector runs automatically as a service in the background. You don’t have to manually start the connector.
On the machine that the HSM is attached to, run the YubiHSM connector in the background. If you’re using the networked setup, the HSM is on the signing server. If you’re using the local setup, run the connector on the line PC. For more information, see Step 1: Choose mode of setup.
On an Ubuntu machine, you run the connector using the yubihsm-connector command without any outputs.
# yubihsm-connector is running without any outputs here.
yubihsm-connector
Step 3: Run the Sidewalk signing tool
The following shows the parameters that the Sidewalk signing tool can accept, some usage examples, and the output of running the tool.
Sidewalk signing tool parameters
The following table shows the parameters that the Sidewalk signing tool can accept and their description. For more information about the signing tool parameters, run the following command.
sidewalk-signing-tool --help
Signing tool parameters
| Parameter | Description |
|---|---|
| --product | The product tag identifying which DAK in HSM is used for the signing operation. This tag will be provided by Amazon for some specific product and usually starts with prefix ‘PREPROD_DAK’ or ‘RNET_DAK’. |
| --pin | The PIN code to access the HSM. Provided by Amazon along with the product tag. |
| --eddsa_csr and --ecdsa_csr | The base64-encoded CSRs generated from the device containing SMSN and public keys to sign. |
| --device_profile_json (AWS Flow only) | The JSON file downloaded from AWS for the device profile, from which the Sidewalk Signing Tool get the app server key and put it to the output file so provision.py can take use of it. This is only for AWS flow; The main reason of having this input is to pass the application server public key from the device profile to provision.py. In ACS flow the public key will be provided explicitly with the command line argument of provision.py. |
| -o | The filename of the output from the Sidewalk Signing Tool, which contains the device certificate and Sidewalk certificate chains that will be used as input of provision.py |
| --connector | The URL for the singing server, including the information for protocol (http or https), IP\/domain name, and the port number. If you are using local installation, it should be the URL to the local yubihsm-connector, which is normally “http://localhost:12345” |
| --ca_cert, --client_cert and --client_key | These 3 arguments are mandatory for establishing HTTPS channel with the signing server. |
General usage example
The following command shows an example of how you run the tool. In this example:
- The arguments
ca_cert,client_cert, andclient_keyare only required when you use the networked installation since it requires authentication between the line PCs and the signing server.
# Usage Example
python3 sidewalk_signing_tool.py --product=<model label> --pin=<hsm pin> \
    --eddsa_csr and=<ED25519_CSR> --ecdsa_csr=<P256R1_CSR> \
    --connector=<connector url> \
    -o out.json [--ca_cert=<CA for signing server> --client_cert=<client certificate> --client_key=<client key>]
Local installation example
The following command shows an example of how you run the tool when using local installation. In this example, the tool runs on the line PC.
# Example for local installation:
python3 sidewalk_signing_tool.py --product=RNET_DAK_PROJNAME --pin=password \
    --eddsa_csr=fmuHcN1VgVddvWiIFkFdmNaGHgPBKWAtlObPtl/n393CG6/jiDQdBgPGgH/8lZoje5ouqmQw2EAcOZshvb/OcEGVZ938JhirSeJq1LAtt6dY6lUWmQ9uvWOfJXQzrfD79p9aRTDLxWYd2/Q82b0b9EfUog6jKRFomXm0016ngc= —ecdsa_csr=0W996GnBnJ60Ih6F/xh+WYuxEgzPRnw86CNuD6r+mVX0Zfyl0o98zV/ztfiiSfm/DVzXefuvI/DeALsRvnJSlHcIbr+OINB0GA8aAf/yVmiN7mi6qZDDYQBw5myG9v85aoSJ/V0l5voCEySRFNOadBXxqLnIhD3papQfpxumHpB5hbnvSQG1wxUT5LpDtkO9dPnH621qufUR+VIT62un2A== \
    --connector=http://localhost:12345
Networked installation example
The following command shows an example of how you run the tool when using local installation. In this example, the tool runs on the line PC and the YubiHSM connector runs on the signing server so a secure connection is required between the two machines.
# Example for networked installation where the signing server is at 192.168.10.100.
# In the signing tool, the ca_cert, client_cert and client_key options
# can be used to set the certificate and specify the expected certificate authority.
python3 sidewalk_signing_tool.py --product=RNET_DAK_PROJNAME --pin=password \
    --eddsa_csr=fmuHcN1VgVddvWiIFkFdmNaGHgPBKWAtlObPtl/n393CG6/jiDQdBgPGgH/8lZoje5ouqmQw2EAcOZshvb/OcEGVZ938JhirSeJq1LAtt6dY6lUWmQ9uvWOfJXQzrfD79p9aRTDLxWYd2/Q82b0b9EfUog6jKRFomXm0016ngc= —ecdsa_csr=0W996GnBnJ60Ih6F/xh+WYuxEgzPRnw86CNuD6r+mVX0Zfyl0o98zV/ztfiiSfm/DVzXefuvI/DeALsRvnJSlHcIbr+OINB0GA8aAf/yVmiN7mi6qZDDYQBw5myG9v85aoSJ/V0l5voCEySRFNOadBXxqLnIhD3papQfpxumHpB5hbnvSQG1wxUT5LpDtkO9dPnH621qufUR+VIT62un2A== \
    --connector=https://192.168.10.100:8081 \
    --ca_cert ca.pem --client_cert client.pem --client_key client.key
Note that the CSRs for --eddsa_csr and --ecdsa_csr are from the output of cert csr "ed25519" and cert csr "p256r1", respectively.
Sidewalk signing tool output
After you run the signing tool using the commands listed below, if the tool runs successfully, the Sidewalk certificate chains will be returned as output. The following code shows a sample output.
{
    "eD25519": "dwhuv44g0HQYDxoB//JWaI3uaLqpkMNhAHDmbIb2/zmN+a4dw3VWBV129aIgWQV2Y1oYeA8EpYC2U5s+2X+ffxxKHdAQ6EIe3UscoBWpmm3UMDq74A24kk8NwS/QmRD5+Yi7fkjzzuCo9CHXAf5RUNr2j8JliufVwGEaUwR31AqMYAD6jIPnd0yKSGVhjIh2U3MSQEmBPm3FUjqZh60xfY6u+3D4B97a439Ern7lZGCSCxw9jKVci5YUArszxwGGWukX8QI+UbHOkoUPsOGuHROGAmiF29XGV8WMJIC6T0Kwve0GocgAeAe2l9tZeGA8vQDTL1ztUU3qpfG1jznKgr/5j9L6trgP8/hI3MjQQ8yKdappcK0PSvrU6Iq9nAKXqq0C/kGUiBSm/Pb5RECHeRfA/HuVI+FNuOhsvSPr3ayXQd05yg37BKMHAHzFPB+QcnBfGz+do1fRXTjTlohjitVDDCyXnI4xHzKG7BjrNc394XQYS3BFgo5CnQ9u129n2sN4G2eHMQmjSyfs+JwyB+EjjV1pEP4nC9yRCVfTPNcG3AqJBzkD0sxqeg11AAADGz+gFBeX/ZNN8VJwnsNfgzj4me1HgVJdUo4W9kvx9cr2jHWkC3Oj/bdBTh1+yBjOC53yHlQK/l1GHrEWiWPPnE434LRxnWkwr8EHD4oieJxC8fkIxkQfj+gHhU79Z+oAAYAAAzsnf9SDIZPoDXF0TdC9POqTgld0oXDl2XPaVD4CvvLearrOSlFv+lsNbC4rgZn23MtIBM/7YQmJwmQ+FXRup6Tkubg1hpz04J/09dxg8UiZmntHiUr1GfkTOFMYqRB+Aw==",
    "p256R1": "dwhuv44g0HQYDxoB//JWaI3uaLqpkMNhAHDmbIb2/znRb33oacGcnrQiHoX/GH5Zi7ESDM9GfDzoI24Pqv6ZVfRl/KXSj3zNX/O1+KJJ+b8NXNd5+68j8N4AuxG+clKUUYYxHxPrn0Nrkjb4zrKnL82uwQ2c+RkGfztCacpsPF/Y67b8j1xKFdp931gelFvxX7Hlb8albMoDO/rqtIqpCItgAPpZ+m3Px2bQIhkMcZttKmC5l68NHIotSSZ97qTZihByryD3JbgqMjgw5rQgJTRfJ1NSOMNHx+gsC8jUd/nKXc9qT80S1/EHBz31oCqkqsUslUzKGzSEQ3lKF9/7vKAoh1WHJUq9GVsMtupA4/jSZ4rjHklaNLP63Oxu3av3ISUnx6DIAHglZhhKZMg94z7EuAdPKhaPaCTRBGQBCKSH36KXKOCmq/QZNgjSuwg+KdA5MnJ3tbTNoPLtyjbWmGjxe8KcwsllD4ck12XzopfG/twfU8zInLCye8vqVYnPizbyKgbTBSjiEjdCssRKHh3CRJvDD/y6MPfjMGyw7EkOcMKdEfD4qKIHAHyGS3vWpe2S+E7VR9JrVkP0bomvmBV/qUKR/OAHXB5KPpk9OoydZ/Rzzgf5+A8USggGpcZ4ayCLbjuhqyc6AsdRTSjzQh7+p/URt9QZkRn7Mu/XVTTNtIVOQcfYdEJ5OUiCXxwgCqvNMifoTmF1tv1cYbiwTIWcyazYt+vbrPOVSHUAAALPsP34BS6EzJO5AsS5pC7QTpjBtAbLN9SdXOT9w4H1x8Nkp0ujLxWRN37IEy0V9DrPK2w1g74uqWPfUPnSBjtvM55JnQpmm23WQNvHa1Vr6zmWDjzjHpcNirPbzXyBlKEhkX4xylaSMnm4UrVXtAMaAJ/csC4HPTKr3dazdvEkhwGAAAIFByCjSp/5WHc4AhsyjMvKCsZQiKgiI8ECwjfXBaSZdY4zYsRlO3FC428H1atrFChFCZT0Bqt5LPXD38bMSB+vAUJiP8XqiEdXeqf2mYMJ5ykoDpwkve/cUQfPpjzFQlQfvwjBwiJDANKkOKoNT3bUGz+/f/pyTE+xMRdIUBZ1Bw==",
    "label": "production",
    "metadata": {
        "smsn": "77086ebf8e20d074180f1a01fff256688dee68baa990c3610070e66c86f6ff39",
        "apid": "pd25"
    }
}
Step 4: Store the Sidewalk Certificate Chains and Application server public key to the device
Once Sidewalk Signing Tool completes the signing, the Sidewalk Certificate Chains of ED25519 and P256R1 for the device are available in the output, fields “eD25519“ and “p256R1’, respectively. These chains have to be stored in the device for onboarding Sidewalk network. Again, use the CLI of Factory Diagnostic Firmware to deliver them to the device. Here is an example:
-
Write ED25519 Sidewalk Certificate Chain
 --> cert chain start "ed25519"
 [00596233] <info> app: {CERT OK}
 --> cert chain write "dwhuv44g0HQYDxoB//JWaI3uaLqpkMNh"
 [00596249] <info> app: {CERT OK}
 --> cert chain write "AHDmbIb2/zmN+a4dw3VWBV129aIgWQV2"
 [00596268] <info> app: {CERT OK}
 --> cert chain write "Y1oYeA8EpYC2U5s+2X+ffxxKHdAQ6EIe"
 [00596286] <info> app: {CERT OK}
 --> cert chain write "3UscoBWpmm3UMDq74A24kk8NwS/QmRD5"
 [00596306] <info> app: {CERT OK}
 ...
 --> cert chain write "AYAAAzsnf9SDIZPoDXF0TdC9POqTgld0"
 [00596668] <info> app: {CERT OK}
 --> cert chain write "oXDl2XPaVD4CvvLearrOSlFv+lsNbC4r"
 [00596691] <info> app: {CERT OK}
 --> cert chain write "gZn23MtIBM/7YQmJwmQ+FXRup6Tkubg1"
 [00596709] <info> app: {CERT OK}
 --> cert chain write "hpz04J/09dxg8UiZmntHiUr1GfkTOFMY"
 [00596740] <info> app: {CERT OK}
 --> cert chain write "qRB+Aw=="
 [00596758] <info> app: {CERT OK}
 --> cert chain commit
 [00596775] <info> app: {CERT OK}
 -->
To pass the certificate chain of ED25519 to the device, you use
cert chain start "ed25519"followed multiplecert chain writewith the certificate chain split into 32-byte pieces. After all data is received by the device, use tocert chain committo finalize it. -
Write P256R1 Sidewalk Certificate Chain
 --> cert chain start "p256r1"
 [00596885] <info> app: {CERT OK}
 --> cert chain write "dwhuv44g0HQYDxoB//JWaI3uaLqpkMNh"
 [00596903] <info> app: {CERT OK}
 --> cert chain write "AHDmbIb2/znRb33oacGcnrQiHoX/GH5Z"
 [00596924] <info> app: {CERT OK}
 --> cert chain write "i7ESDM9GfDzoI24Pqv6ZVfRl/KXSj3zN"
 [00596941] <info> app: {CERT OK}
 --> cert chain write "X/O1+KJJ+b8NXNd5+68j8N4AuxG+clKU"
 [00596959] <info> app: {CERT OK}
 ...
 --> cert chain write "BaSZdY4zYsRlO3FC428H1atrFChFCZT0"
 [00597469] <info> app: {CERT OK}
 --> cert chain write "Bqt5LPXD38bMSB+vAUJiP8XqiEdXeqf2"
 [00597486] <info> app: {CERT OK}
 --> cert chain write "mYMJ5ykoDpwkve/cUQfPpjzFQlQfvwjB"
 [00597502] <info> app: {CERT OK}
 --> cert chain write "wiJDANKkOKoNT3bUGz+/f/pyTE+xMRdI"
 [00597518] <info> app: {CERT OK}
 --> cert chain write "UBZ1Bw=="
 [00597537] <info> app: {CERT OK}
 --> cert chain commit
 [00597554] <info> app: {CERT OK}
 -->
The similar process for P256R1 certificate chain expect starting with
cert chain start "p256r1"instead ofcert chain start "ed25519" -
Write Application server public key
 --> cert app_key start
 [00597642] <info> app: {CERT OK}
 --> cert app_key write "Qv+5ZIOzMxHWlVv0OQ3gh3/3/PM3t8+J"
 [00597663] <info> app: {CERT OK}
 --> cert app_key write "QnsNvDLpa5k="
 [00597680] <info> app: {CERT OK}
 --> cert app_key commit
 [00597697] <info> app: {CERT OK}
The Application server public key can be obtained from AWS IoT console in the Device Profile page. Also, it needs to be encoded into base64 format.
Step 5: Store all received data and de-initialize the provisioning engine
--> cert store
[00598327] <info> app: {CERT OK}
--> cert deinit
[00598428] <info> app: {CERT OK}
-->
Command cert store tells the devices to save the Sidewalk certificate chains and Application server public key into the storage of the device and complete the provisioning on the device side.
Next Step: Constructing and uploading Sidewalk control logs