Setting up the host
This section shows how the CM must set up the host for mass manufacturing Sidewalk devices. See Required toolkit and Pre-requisites.
Important The steps in this section need to be performed by the CM who will manufacture your Sidewalk devices for mass production, using the Sidewalk device CLI and the Sidewalk signing tool.
Topics
- Step 1: Choose mode of setup
- Step 2: Install YubiHSM SDK
- Step 3: Install OpenSSL
- Step 4: Install Sidewalk signing tool
- Step 5: Generate certificates for mutual authentication (networked setup)
- Step 6: Install Nginx on signing server (networked setup)
Step 1: Choose mode of setup
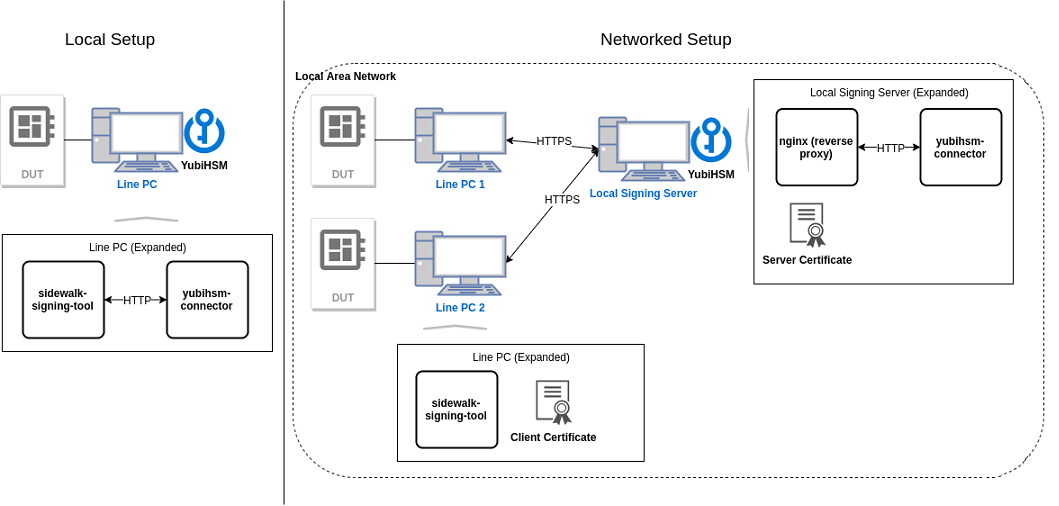
Depending on how you want to manufacture your devices, you can use a local or a networked setup. A local setup has both the signing tool and the YubiHSM connector running on the same machine. A networked setup moves the connector component into a server PC that is accessible through the local area network. If an HSM attached to a the signing server can support multiple line PCs, we recommend using a networked setup. Using a local setup requires every line PC to be associated with an HSM.
This table shows more about the two modes of setup and the tools that must be installed on the hosts.
Local and networked setup 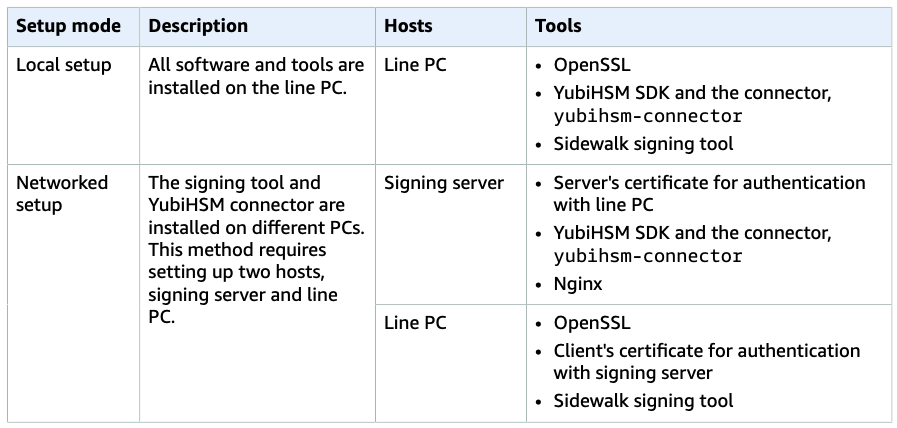
Step 2: Install YubiHSM SDK
Visit the YubiHSM2 libraries and tools page for additional information and support on HSM. You can see a list of all available downloads ordered by version, starting with the most recent version on the YubiHSM2 releases page. Select to download the SDK for your Windows or Ubuntu system environment, and follow the YubiHSM2 Usage Guide for installing the YubiHSM 2 tools and software
Step 3: Install OpenSSL
To use the line PC, you must have OpenSSL installed. On an Ubuntu machine, OpenSSL is available with the default installation. For more information, see OpenSSL. On a Windows machine, you can install OpenSSL from the OpenSSL binaries page.
Step 4: Install Sidewalk signing tool
The Sidewalk signing tool accepts and takes the CSR, and outputs the encoded signed Sidewalk certificate chain. To use the Sidewalk signing tool.
-
First contact Amazon Sidewalk support to get the latest version of the signing tool,
sidewalk-signing-tool.py. -
After you receive the tool, install it by following the instructions in the README.md document.
-
To install the required Python dependencies for using the signing tool, such as the Python interpreter, run the requirements file,
requirements.txtcontained in the signing tool. It will then install the required Python dependencies using pip.pip3 install -r requirements.txt
Step 5: Generate certificates for mutual authentication (networked setup)
This step is required only if you’re using the networked setup.
When using a networked setup, the HSM and the Sidewalk signing tool are located in different machines. To secure traffic over the network and use a secure connection between the two machines, we recommend that you use mutually authenticated TLS for the client and server to authenticate each other.
-
Generate a local signing authority
Generate a local signing authority that will be used to endorse both the client and server certificates. When you run this command, you’ll be prompted to enter a passphrase, and any phrase can be used.
openssl req -new -x509 -subj "/CN=Sidewalk CA/" -keyout ca.key -out ca.pem -days 365You must securely store the key,
ca.key. It must not be visible to the line PC or the signing server. -
Generate server certificate
Generate the server certificate that the server will present to the Sidewalk signing tool when setting up a connection. The certificate is signed by the Local Signing Authority. To generate the server certificate.
-
First create a V3 extension file,
v3_server.ext.authorityKeyIdentifier=keyid,issuer basicConstraints=CA:FALSE keyUsage = digitalSignature, nonRepudiation, keyEncipherment, dataEncipherment extendedKeyUsage = serverAuth -
Then create the server certificate.
# Create the Certificate Signing Request
openssl req -new -newkey rsa:2048 -sha256 -nodes \
    -keyout server.key -out server.csr

# Generate the certificate signed by the CA
openssl x509 -req -days 365 -CA ca.pem -CAkey ca.key -CAcreateserial \
     -in server.csr -sha256 -out server.pem -extfile v3_server.ext

# Enter the passphase provided when generating the local signing authority
# Enter the IP/domain address of the server when asked for the "Common Name" (e.g. server FQDN or IP)
-
-
Generate client certificate
Generate the client certificate for the signing tool that will be presented to the server during authentication. You create the client certificate similar to how you created the server certificate.
-
First create a V3 extension file,
v3_client.extauthorityKeyIdentifier=keyid,issuer basicConstraints=CA:FALSE keyUsage = digitalSignature, nonRepudiation, keyEncipherment, dataEncipherment extendedKeyUsage = clientAuth -
Then create the client certificate.
# create a certificate signing request
openssl req -new -newkey rsa:2048 -sha256 -nodes -keyout client.key -out client.csr

# create the client certificates signed with the Certificate Authority
openssl x509 -req -days 365 -CA ca.pem -CAkey ca.key \
     -CAcreateserial -in client.csr -sha256 -out client.pem -extfile v3_client.ext
-
Step 6: Install Nginx on signing server (networked setup)
This step is required only if you’re using the networked setup.
Nginx is a web server that you install on the signing server for mutual authentication between the signing server and line PC. To install and configure Nginx, perform the following steps.
-
Install Nginx
Go to the Nginx website and install the tool by following the platform-specific instructions as described in the Installing Nginx open source documentation.
[ Windows ]
On a Windows machine, you can download the prebuilt Nginx binary from the Nginx for Windows web page. Unzip the binary file into the
C:\nginxfolder and then run it to install Nginx.[ Ubuntu ]
On an Ubuntu machine, you can install Nginx using
apt.sudo apt install -y nginx -
Configure Nginx
Configure Nginx depending on the platform that you’re running it from.
[ Windows ]
On a Windows machine, edit the configuration file at
c:\nginx\conf\nginx.confdirectly and replace the sectionserverwith the following configuration similar to the Ubuntu section. In this example:log_pathis the path where the Nginx log is stored, such asC:/nginx.cert_pathis the path where the certificate is stored.
server
{
   listen 8081 ssl;
   listen [::]:8081 ssl;

   access_log C:/nginx/reverse-access.log;
   error_log C:/nginx/reverse-error.log;

   ssl_certificate <path>/server.pem;
   ssl_certificate_key <path>/server.key;

   ssl_client_certificate <path>/ca.pem;
   ssl_verify_client on;
   ssl_verify_depth 1;

   location / {
      if ($ssl_client_verify != SUCCESS) {
         return 403;
      }
      proxy_pass http://127.0.0.1:12345;
   }
}
[ Ubuntu ]
On an Ubuntu machine, perform the following steps to configure and enable Nginx.
- Create a configuration file,
/etc/nginx/sites-available/reverse-proxy.conf, with these contents for the server configuration. In this example:log_pathis the path where the Nginx log is stored, such as/var/log/nginx.cert_pathis the path where the certificate is stored.
server { listen 8081 ssl; listen [::]:8081 ssl; access_log /var/log/nginx/reverse-access.log; error_log /var/log/nginx/reverse-error.log; ssl_certificate <path>/server.pem; ssl_certificate_key <path>/server.key; ssl_client_certificate <path>/ca.pem; ssl_verify_client on; ssl_verify_depth 1; location / { if ($ssl_client_verify != SUCCESS) { return 403; } proxy_pass http://127.0.0.1:12345; } } -
Enable the
configby running the following command.sudo ln -s /etc/nginx/sites-available/reverse-proxy.conf /etc/nginx/sites-enabled/reverse-proxy.conf
-
Enable Nginx
Run the following platform-specific commands to enable Nginx.
[ Windows ]
On a Windows machine, run this command to enable Nginx.
C:\nginx>start nginx[ Ubuntu ]
On an Ubuntu machine, run this command to restart and run Nginx.
sudo systemctl restart nginx
Next Step: Provisioning with CSR and Sidewalk Signing tool